Jean Zay Ultimate Guide
(Updated on 11 July 2024)
- Introduction
- Jean Zay account application
- First connection on Jean Zay
- Quick look at the storage spaces on Jean Zay
- Python environment on Jean Zay
- Launch JupyterLab/Notebook on Jean Zay
- Job submission
- Data Transfer to/from Jean Zay
- References
Introduction
Jean Zay is a supercomputer converged platform acquired by the French Ministry of Higher Education, Research and Innovation through the intermediary of the French civil company, GENCI (Grand Equipement National De Calcul Intensif). More history of Jean Zay platform can be found here.
Jean Zay offers the possibility to extend the classic usage modes of high performance computing to new usages in artificial intelligence (AI). Jean Zay might be a great alternative to Creatis’s own cluster if you intend to run multiple codes at once to prevent the overload of the cluster. All CPU, GPU, and software configurations of Jean Zay are detailed here.
Jean Zay account application
Usually, all members of Creatis are eligible to apply their own Jean Zay’s account. Before getting too excited about the application, it is important to know that there are two types of access:
- Dynamic Access (AD):
- If your desired number of hours for CPU or GPU ≤ 50,000
- Requests for resources may be made throughout the year and are renewable
- Regular Access (AR):
- If your desired number of hours for CPU or GPU > 50,000
- Application is only open at a specific time
More information about Dynamic Access and Regular Access can be found here. Only procedures to apply Dynamic Access for GPU resources will be detailed in this guide. For other purposes, please contact Thomas Baudier.
Request for resources
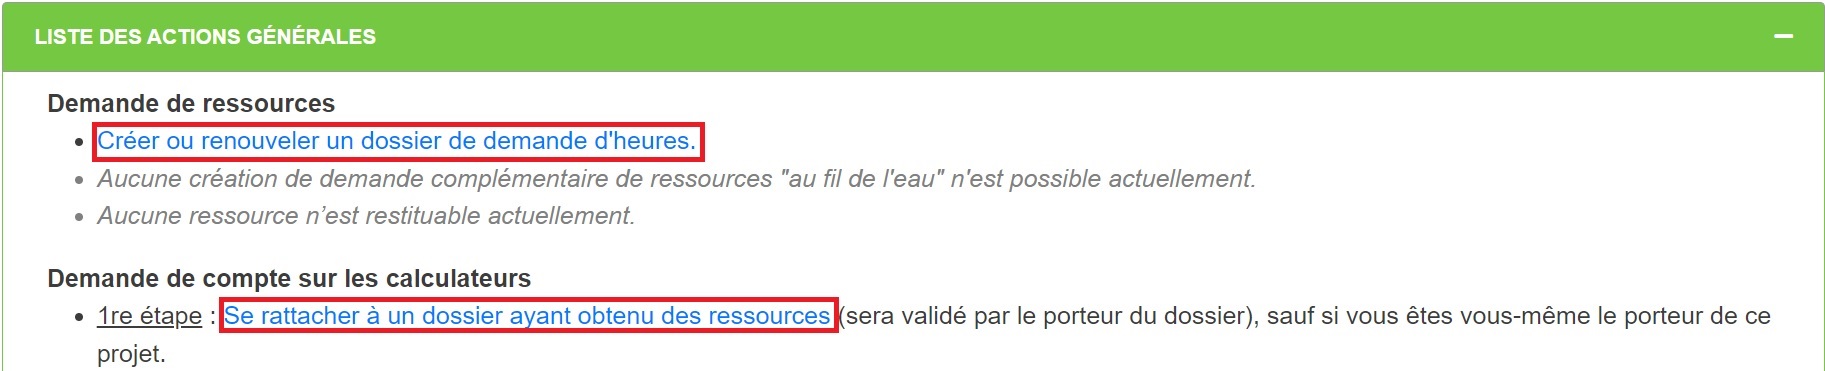
The first thing to do is to create an account on eDARI. After logging in with your created account, you can request for resources and create your project by clicking on “Créer ou renouveler un dossier de demande d’heures” in the Demande de ressources tab. If you wish to collaborate on a project, you can attach to a project created by one of your collaborators by clicking on “Se rattacher à un dossier ayant obtenu des ressources” in the Demande de compte sur les calculateurs tab and then entering the project number.
In the form you have to describe your project, the type of data you use, the resources you plan to request etc. A project proposal is needed if you request more than 10k GPU hours. Again, the Correspondant technique is Fabrice BELLET.
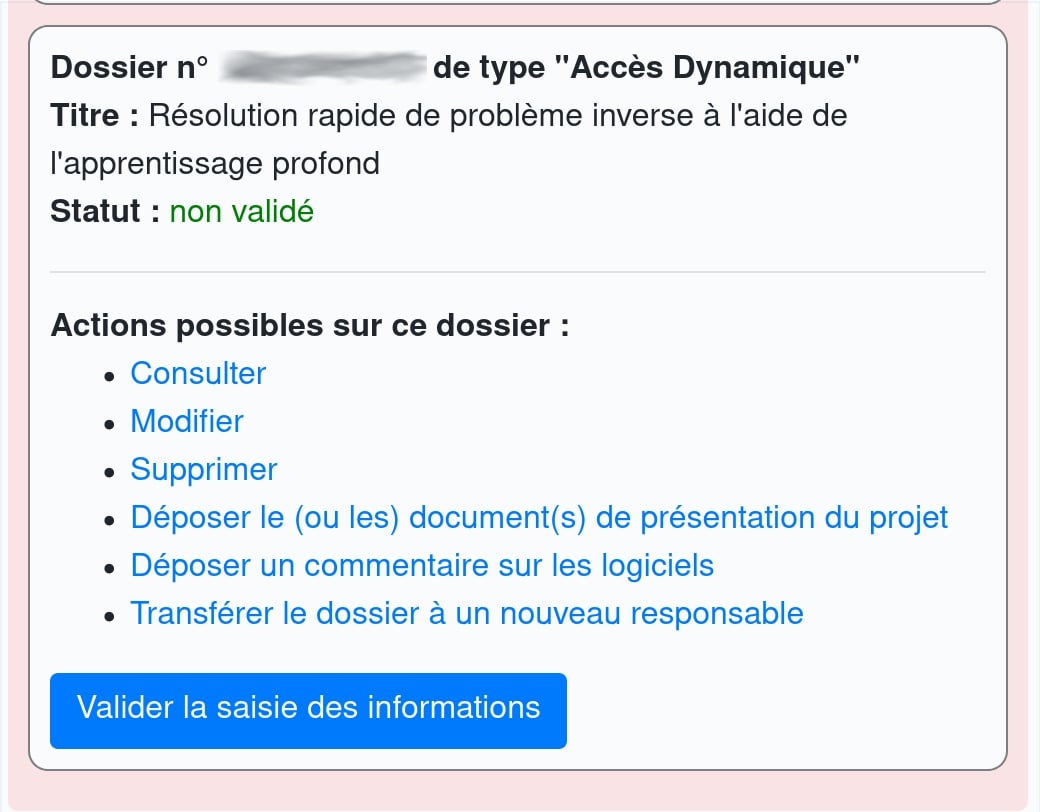
⚠️ Don’t forget to validate your information by clicking on click on “Valider la saisie des informations”!
Request for an account on calculators
The next step is to apply for an account to use on the supercomputers. This can only be done after your project (or your collaborator’s project) has been validated and you have attached yourself to it. To do this, click on “Se rattacher à un dossier ayant obtenu des ressources” and enter your project number. Then, you can request for your account by clicking on “Faire une demande d’ouverture de compte ou consulter le statut de votre demande d’ouverture de compte” in the Demande de compte sur les calculateurs tab.

It is quite simple to fill the application form. Most of the time, the details of Creatis lab are pre-filled when you select Creatis in the Research Lab section. Some important information is included below just in case:
- Directeur du laboratoire
- M. BEUF Olivier
- olivier.beuf@creatis.insa-lyon.fr
- Responsable sécurité de l’utilisateur
- M. BELLET Fabrice
- fabrice.bellet@creatis.insa-lyon.fr
- 0472436142
- Adresse IP (Internet Protocol) de connexion & FQDN (Fully Qualified Domain Name)
- 195.220.108.5 (If you have a laptop) & tux.creatis.insa-lyon.fr
- Use this to get your IP address and FQDN if you have a desktop PC
- It is recommended to use tux’s IP address even if you own a desktop PC so that you can access to Jean Zay everywhere via tux
You will also need to enter 8 characters of your password, which you will use later to log in to the supercomputer.
📝 These 8 characters will be the last 8 characters of your first Jean Zay’s password, which you will have to combine with the first part of the password sent by IDRIS after the creation of your account.
⚠️ Don’t forget to validate your information by clicking on click on “Valider la saisie des informations”!

⚠️ If after validating your information eDARI asks for a non-electronic signature, ask the secretariat (if possible) to add you to the Reseda database. Once this has been done, wait a day or so to cancel your account opening request and reopen another one. You should then be able to sign electronically.
After submitting the application form, you will soon receive an email to fill another online questionnaire and upload your CV.
Congratulations! You have finally completed all the administrative procedures to request your access to Jean Zay. Now all you have to do is wait! 😄 Yes, you will have to wait about 1-2 months before you receive your username and password.
📝 For non-French applicants, the delay may be a little longer as the CNRS has to check your file for security purposes (FSD, ASSAV…).
First connection on Jean Zay
If you are here, it means your application is successful, and you’ve received your Jean Zay username and password. 👏👏 Yes, the username is weird. Don’t be surprised if you get something like ubz52ne, it’s completely normal.
The Jean Zay platform is only accessible via the IP address that you declared during your supercalculator account request. To do this, simply type the following command in a terminal or Putty for Windows users:
# For those who filled in tux's IP address. Skip this if you've filled in your PC's IP address
ssh <username>@tux.creatis.insa-lyon.fr # Replace <username> by your Creatis username, e.g. abc@tux.creatis.insa-lyon.fr

# Connect to Jean Zay platform
ssh <jean-zay-username>@jean-zay.idris.fr # Replace <jean-zay-username> by your Jean Zay username, e.g. ubz52ne@jean-zay.idris.fr
After entering these commands, you will be asked to enter your password. Do you remember the password you’ve received by email and the 8 characters you entered during your supercalculator account request? Yes, your login password is the combination of these two. 😂 Don’t worry, you will be able to change your password immediately.
Once you’ve entered the first login password and changed the password, you should see something like this:
Last login: Wed Jun  1 06:34:27 2022 from 195.220.108.5
***********************************************************************
* Ceci est un serveur de calcul de l'IDRIS. Tout acces au systeme     *
* doit etre specifiquement autorise par l'IDRIS. Si vous tentez de    *
* de continuer a acceder cette machine alors que vous n'y etes pas    *
* autorise, vous vous exposez a des poursuites judiciaires.           *
*                               ---                                   *
* This is an IDRIS compute node.  Each access to this system must be  *
* properly authorized by IDRIS. If you go on accessing this machine   *
* without authorization, then you are liable to prosecution.          *
***********************************************************************
*                                                                     *
* Orsay      CNRS / IDRIS - Frontale  -  jean-zay.idris.fr   France   *
*                                                                     *
***********************************************************************
You’ve now successfully connected to the Jean Zay platform. Don’t get too excited because you’ll have to wait another 12-24 hours before running any code because Jean Zay needs to verify your IP address. 😄
You can still use your password for future connections. However, I recommend that you log in with your private ssh key. To do this, you’ll need to store your public key in the authorized_keys file on Jean Zay and your private key in ~/.ssh/ on tux or your local machine.
To transfer your public key to the authorized_keys file on Jean Zay, simply type this on your local machine:
# Make sure your private key has the correct permission
chmod 600 ~/.ssh/id_rsa

# Transfer your public key (~/.ssh/id_rsa.pub) into the authorized_keys file on Jean Zay
ssh-copy-id <jean-zay-username>@jean-zay.idris.fr
To enter your passphrase only once using the ssh-agent program, enter the following two commands on your local machine or tux:
eval 'ssh-agent'
ssh-add ~/.ssh/id_rsa
⚠️ Connection without entering the passphrase is limited to the lifespan of the agent. You must restart the agent for each new session.
More detailed instructions can be found [here] (http://www.idris.fr/eng/faqs/ssh_keys-eng.html). From now on you can connect to Jean Zay without entering your password 😉.
Quick look at the storage spaces on Jean Zay
Jean Zay offers several places to store your dataset or repository. I will cover only 3 of them. For more details, pleaser see here.
$HOMEor/linkhome/rech/gencre01/<jean-zay-username>/- Only 3Gb
- Use to store your config files or repository
$WORKor/gpfswork/rech/<your-project-account>/<jean-zay-username>/- Bigger space: 5Tb.
- 100Gb/s read/write speed
- Limited in inodes (500k). You will reach this quota very soon if you have a lot of folders/subfolders.
<your-project-account>is usually consisted of 3 alphabets, e.g.abc. Pay extra attention if you have multiple projects. Make sure you work in the correct project space.- If you have any collaborator, the shared space in
$ALL_CCFRWORK or /gpfswork/rech/<your-project-account>/commun/might be useful for data sharing.
$SCRATCHor/gpfsscratch/rech/<your-project-account>/<jean-zay-username>/- Very large space (2.5Pb) shared by all users
- 500Gb/s read/write speed
- Will be deleted after 30 days of inactivity
idrquota can be used to track your space usage.
usage: idrquota [-h] [-t {Kio,Mio,Gio,Tio,Pio}] [-m] [-u USERNAME] [-w] [-s] [-p PROJECT]

Display quota information for the user or the projects.

Normal users can display the quotas of their home directory and the work/store
quotas for their projects.

Privileged users can display the quotas of other users and projects.

optional arguments:
  -h, --help            show this help message and exit
  -t {Kio,Mio,Gio,Tio,Pio}, --unit {Kio,Mio,Gio,Tio,Pio}
                        the quota block unit (default: Gio)
  -m, --home            show the home quota of the user
  -u USERNAME, --username USERNAME
                        the username (default: current user)
                        only usable by privileged users
  -w, --work            show the work quota of the project
  -s, --store           show the store quota of the project
  -p PROJECT, --project PROJECT
                        the groupname of the project (default: current project)
Python environment on Jean Zay
It is possible and easy to set up a conda environment on Jean Zay. Previously, you had to install conda to create a conda environment. Now it is preinstalled for all users. By default, conda packages are installed in $HOME/.conda. Since $HOME space is limited, it is recommended to move this folder to $WORK and create a symbolic link in $HOME. This can be done with the following commands:
# move the conda directory to $WORK
mv $HOME/.conda $WORK

# create a symbolic link in $HOME
ln -s $WORK/.conda $HOME
If the $HOME/.conda does not already exist, you have to create it by yourself directly in $WORK:
# create conda directory in $WORK
mkdir $WORK/.conda

# create a symbolic link in HOME
ln -s $WORK/.conda $HOME
Conda is only recommended for those who need multiple Python environments on Jean Zay (e.g. different
projects with potentially conflicting packages), as the ./conda directory consumes a lot of inodes.
For people using only one Python environment, you can simply install the existing “modules” on Jean
Zay and then add the missing packages using pip. The advantage of this approach is that most of the
packages modules are already compiled and optimized for Jean Zay.
Some useful commands:
- list available modules:
module avail. For examplemodule avail pytorch-gpu - load a module:
module load <module_name> - obtain a complete list of associated modules after the module is loaded:
module list - unload all modules:
module purge.
More information can be found here.
Launch JupyterLab/Notebook on Jean Zay
Yes, you can launch JupyterLab/Notebook on Jean Zay. Jean Zay has finally simplified the process! 😃 The new tool created by Jean Zay, JupyterHub, allows you to launch Jupyter Notebooks and other applications like MLflow and Dask via a web interface. JupyterHub can be accessed from this website on the machine whose IP address you declared during the application. You can also access this site through a proxy machine (see here for more details).
The connection procedure on this website are similar to those for accessing the Jean Zay front ends, i.e., your Jean Zay username and password. The login page looks like this:

Once authenticated, you will be asked to create a new JupyterLab instance.
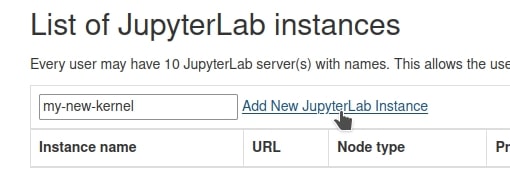
This instance can be created either on a front-end node with internet access, or a compute node via Slurm. In both cases, you have to select some configurations (work space, allocated resources, duration, etc.).


Jean Zay provides kernels which are based on modules installed on Jean Zay. If you want to use your own environment, remember to install ipykernel in your conda environment beforehand:
# activate your environment
conda activate <your env>

# install ipykernel
conda install ipykernel

# add kernel for <your env>
python -m ipykernel install --user --name <name of kernel>
More details are available here.
Job submission
For those who are familiar with the Creatis cluster, the job submission on Jean Zay is quite similar. For job management on Jean Zay, slurm is used instead of pbs. You have the possibility to submit an interactive or a batch job.
Interactive job
The command to start an interactive bash terminal:
srun --pty --nodes=1 --ntasks-per-node=1 --cpus-per-task=10 --gres=gpu:1 --hint=nomultithread [--other-options] bash
More details can be found here.
Batch job
To submit a batch job, you have to create a submission script xxxx.slurm. Here is an example for a job with 1 GPU in default GPU partition. The %j in the --output line tells SLURM to replace the job ID in the name of the output file.
#!/bin/bash
#SBATCH --account=xxx@v100           # select the account to use for multi-account user
#SBATCH --job-name=single_gpu        # name of job
#SBATCH --mail-type=END,FAIL         # Mail events (NONE, BEGIN, END, FAIL, ALL)
#SBATCH --mail-user=email@ufl.edu    # Where to send mail
##SBATCH --qos=qos_gpu-t4            # uncoment to use the Quality of Service (QoS) t4
#SBATCH --nodes=1                    # Run all processes on a single node
#SBATCH --ntasks=1                   # Run a single task
#SBATCH --gres=gpu:1                 # number of GPUs
#SBATCH --cpus-per-task=10           # Number of CPU cores per task
# /!\ Caution, "multithread" in Slurm vocabulary refers to hyperthreading.
#SBATCH --hint=nomultithread         # hyperthreading is deactivated
#SBATCH --time=20:00:00              # maximum execution time requested (HH:MM:SS)
#SBATCH --output=gpu_single_%j.out   # name of output file
#SBATCH --error=gpu_single_%j.err    # name of error file

# cleans out the modules loaded in interactive and inherited by default
module purge

# activate custom conda environment
conda activate <your-environment>

# or loading modules
module load ...

# echo of launched commands
set -x

# code execution
python -u script_mono_gpu.py        # option -u (= unbuffered) deactivates the buffering of standard outputs which are automatically effectuated by Slurm
By default, the submitted GPU job is run on the gpu_p13 partition, which allows a maximum execution time of 20 hours. After that, you must manually resume your job. If you intend to submit a job that will take longer than 20 hours, you may specify the Quality of Service (QoS) qos_gpu-t4 which allows a maximum execution time of 100 hours. However, this means that your job will be less prioritized than those queued for gpu_p13. To learn more about Jean Zay’s GPU Slurm partitions, click here.
Some useful commands:
- To submit the script via the
sbatchcommand:
sbatch single_gpu.slurm - To monitor jobs which are waiting or in execution:
squeue -u $USER # Example of output JOBID PARTITION NAME USER ST TIME NODES NODELIST(REASON) 235 part_name test abc R 00:02 1 r6i3n1 - To cancel an execution:
scancel $JOBID
Data Transfer to/from Jean Zay
There are two ways to transfer your data to Jean Zay, depending on the IP address you provided during the account creation. If you’ve provided the IP address of your own desktop computer, you can simply use sshfs or FileZilla . What if you’ve decalred the IP address of tux? Well, in that case (just like me, who has a laptop 😥), you’ll have to transfer your data to tux first (via sshfs), then transfer it to Jean via scp. To facilitate the transfer, it’s better to create a bash file. For example:
# Sample bash file to transfer data from tux to Jean Zay
#!/bin/bash

pTarget=...     # target path
pSource=...     # source path

scp -r $pSource <jean-zay-username>@jean-zay.idris.fr:$pTarget
# Sample bash file to transfer data from Jean Zay to tux
#!/bin/bash

pTarget=...     # target path
pSource=...     # source path

scp -r $pSource <creatis-username>@tux.creatis.insa-lyon.fr:$pTarget
For larger files/folders, it is better to use rsync, which is much faster than scp.
Old stuffs
This section contains outdated information. I’m just keeping it for my personal archives.
Installation of miniconda
A quick how to install miniconda in your $WORK directory:
# download Miniconda installer
wget https://repo.continuum.io/miniconda/Miniconda3-latest-Linux-x86_64.sh \
    -O miniconda.sh
# install Miniconda
MINICONDA_PATH=$WORK/miniconda3
chmod +x miniconda.sh && ./miniconda.sh -b -p $MINICONDA_PATH
# make sure conda is up-to-date
source $MINICONDA_PATH/etc/profile.d/conda.sh
conda update --yes conda
# Update your .bashrc to initialise your conda base environment on each login
conda init
By default, the .bashrc is not executed when connecting on the cluster. To make sure it is run, add a file ~/.bash_profile with
#
# ~/.bash_profile
#

[[ -f ~/.bashrc ]] && . ~/.bashrc
Launch Jupyter Notebook
It is not that straightforward and requires some tweaks. Some modules provided by Jean Zay already have JupyterLab/Notebook installed. Click here for more information.
In this section, I will only focus on how to correctly install Jupyter-related packages in your conda base environment. By doing this, you don’t have to install JupyterLab/Notebook in every conda environment you create. Hang tight! 😃
- Make sure you’ve installed
minicondain your$WORKdirectory, otherwise refer to previous section. - Type
conda deactivateto go to thebaseenvironment. - Install Jupyter Notebook (Optional if you only plan to use JupyterLab)
conda install -c conda-forge notebook conda install -c conda-forge nb_conda_kernels - Install Jupyter Lab
conda install -c conda-forge jupyterlab conda install -c conda-forge nb_conda_kernels # Ignore this if you've run this in Step 2 - Install Jupyter extensions
conda install -c conda-forge jupyter_contrib_nbextensions
Your base environment now supports JupyterLab/Notebook. To be able to switch environment after launching JupyterLab/Notebook in the base environment, make sure you install ipykernel in every future environment you create. A simple way to do so:
conda create -n <your-environment> ipykernel
To launch JupyterLab/Notebook on Jean Zay, type:
# Launch JupyterLab
idrlab

# Or launch Jupyter Notebook
idrjup
After entering this, you will see something like this:
INFO 2019-11-22 12:10:08,916 Starting Jupyter server. Please wait ...:
INFO 2019-11-22 12:10:08,933 --Launching Jupyter server. Please wait before attempting to connect ...
INFO 2019-11-22 12:10:14,070 --Jupyter server launched. Please connect.
URL de connexion :     https://idrvprox.idris.fr
Mot de passe URL :     <mot de passe utilisateur>
Mot de passe jupyter : abc1defg2hijk3lmno4pqrs5tuvw6xyz
Next:
- You have to open a browser from a machine for which you have declared the IP address and enter the displayed URL connection:
https://idrvprox.idris.fr. -
An Identification page will be loaded:

- Enter your Jean Zay identifiers (username and password) and click on
Login. -
In the list of active sessions which appears, select the one you wish to reach by clicking on
Submit Query.
-
On the page which then displays, enter the random Jupyter password returned by the
idrjuporidrlabcommand (in this example,abc1defg2hijk3lmno4pqrs5tuvw6xyz) and click onLog in.
Again, more detailed explanations can be found here.
📝 If you intend to run a Jupyter script for a long time (few hours), it is better to include the following lines in your
~/.ssh/configon your personal machine. This is to prevent the ssh’s connection loss and the job deletion due to the inactive of the ssh client.# Create the config file touch ~/.ssh/config # Append the following lines in your config file host * UseRoaming no ServerAliveInterval 300
References